Pages

Thursday, 8 March 2012

Error 1723: Can not uninstall JRE update X from Windows 7

I came across this today whilst helping one of our install techs update Java for a customer on a machine he was installing.

It was Windows 7 Ent 64bit SP1 with Java v19 installed.  Upon attempting to uninstall he received the error:

Error 1723: Can not uninstall JRE update from Windows 7.

After a bit of digging around I discovered the error was referring to a missing DLL.

By going into the registry and finding the MSI entry I tried an uninstall using the following command:

msiexec.exe /x{26A24AE4-039D-4CA4-87B4-2F83216019FF}

This was found here: HKEY_LOCAL_MACHINE\SOFTWARE\Microsoft\Windows\CurrentVersion\Uninstall   -  this is a great tip for any app packagers needing to discover the msi registered to a piece of software for uninstalls etc...

Again I received the same error message.  To enable error logging I added /L javauninst.log and discovered it was missing the "regutils.dll" located here: C:\Program Files (x86)\Java\jre6\bin

I copied the file across from an existing machine and voilĂ  - it worked !

Another Java/MSI quirk but non the less slightly perplexing to say the least. 

Hope this helps someone else sometime...

C

Thursday, 2 February 2012

This task sequence cannot be run because a package referenced by the task sequence could not be found.

If like me you have been bashing your head against many firewalls during Windows 7 OSD via SCCM you will probably sometime come across the error:

This task sequence cannot be run because a package referenced by the task sequence could not be found.

More annoyingly it doesn't reference the guilty package in the onscreen error.  After checking the many log files CCM generates I found within the RAM drive path: x:\windows\temp\SMSTSLog resides the relevent SMSTS.LOG file.

The full error I recieved was after selecting the relevant OSD TS; resolving polices and then BAM :

This task sequence cannot be run because a package referenced by the task sequence could not be found. For more information, please contact your system administrator or helpdesk operator.

I also noticed (and please use SMS Trace to view error logs):

Failed to find CCM_SoftwareDistribution object for AdvertID="xxx", PackageID="xxx", ProgramID="*"

I found it was a Lenovo Graphics Driver Package causing the issue; it appears SCCM has yet another little "quirk" where the hash isn't written sometimes upon creation of a package and the initial ditribution.  If the version number of the guilty package is "1" try right clicking on the DP of the package and select "Update Distribution Points".

After some time the Source Version will increment to "2" and the date will be current - give your OSD another try and then see if it works - if it fails - check the log file again as this time the guilty package may have changed and it may be a case of trawling through a few before you resolve the issue.

I hope this helps.

Many thanks to J over at ManagedUX for the pointer!


Thursday, 12 January 2012

Enable LENOVO TPM Security Chip (and other stuff) from a TS

Enable LENOVO TPM Security Chip (and other stuff) from a TS

Thursday, 27 October 2011

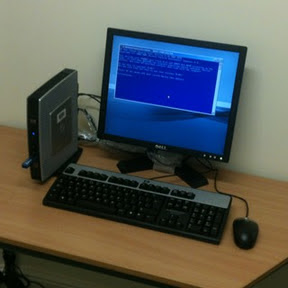
Today's project

Setting up Thin Clients at one of our customers drop in centres....

Not the most glam of jobs but gets me out of my cage for a while...


- Posted using BlogPress from my iPhone

Friday, 14 October 2011

Lenovo Driver Installs via OS Deployment

Any tech unfortunate enough to have to visit Lenovo's driver page will agree it isn't the friendliest of places.  Kind of like my home town of Preston at about 2am on a Sunday morning; you only go there if you have to and get the hell out of there as quick as you can - and DON'T make eye contact with anyone!

The naming convention in non existent - unlike their competition such as Dell and HP who have meaningful, descriptive file names for their drivers and respective folders.

If you require a solution to deploy Lenovo drivers throughout your estate then don't despair - there is an answer.

In addition to the handy [yeah, don't do us any favors Lenovo] TVT System Updater tool they provide for individual clients they also developed the "Update Retriever" & "ThinInstaller" as part of their Think Vantage Toolkit (TVT) branded client tool solution.

To configure SCCM to deliver driver updates (it's also capable of MS updates but that's another story) there are a couple of solutions out there but this is the one I settled with:

Assumptions :
  • You have a deployment solution in place already with relevant TaskSequence - if not please see the wonderful WindowsNoob tutorials- big shout out to Niall Brady for this site - it's an invaluable resource to any SCCM tech.
  • You are proficient with SCCM
  • You know the machine type of the Lenovo machine you are using

  • Download the above software and install Update Retriever [UR] locally on your machine or the SCCM server.  Set it up and create a folder to act as the repository for the update and driver files and share it out - mines called "Update Retiever".  Tell UR to download to this folder (follow Lenovo's instructions if your struggling but it's straight forward)
  • Create a package in SCCM for ThinInstaller (TI) from the files that are extracted from the crappy compressed .exe you end up with and within the package create a program as below:
  1. Create a batch file and call it something meaningful like "copyfiles.bat"
  2. Within the batch file use the command: xcopy.exe \\SCCMSERVER\DISTRIBUTIONPOINT\PACKAGENAME\*.* c:\lenovo\thininstaller\ /E /D where SCCMSERVER = your servername/IP of server DISTRIBUTIONPOINT = the folder used for your DP packages (i.e. SMSPKGD$) and PACKAGENAME = the name of the package (i.e. LCT000B8).  This will copy the ThinInstaller software locally to the client as it needs to run from a local folder and doesn't extract and "install" as such.
  3. Create an "Install Software" task sequence entry under "State Restore" that calls the batch file "copyfiles.bat"
  • Create a "Run Command Line" task sequence and call it something like "Run ThinInstaller"
  • Use cmd line: cmd.exe /c thininstaller.exe /CM -search A -action INSTALL -repository \\SCCMSERVER\Update_Retriever  -noicon -includerebootpackages 1,2,3,4 -noreboot *don't forget to change this path to suit your config.
  • Start in: c:\lenovo\thininstaller -this is where the files were copied to.
  • Time-out - 120
This should now enable the client to run ThinInstaller locally and pull over all the relevant drivers for that model.

Wednesday, 12 October 2011

Training Ahoy!

Finally it looks like I will be undergoing some SCCM training.  My employer have agreed to send me on Microsoft's M6451 "Planning, Deploying and Managing Microsoft System Center Configuration Manager 2007" at QA in Manchester.

This is what I have wanted to do for a while now - hopefully I can do the 70-401 exam soon enough and get my MSTS!

PXE Boot pulling the wrong Windows PE wim

 If like me you are working with multiple architectures of Microsoft OS there will be occasions where you would like to push out a 64bit OS - more so in recent years due to the increasing popularity of 64bit platforms.

SCCM is my weapon of choice but I have found that sometimes even if a machine is placed in the 64bit deployment collection with the 64bit deployment task sequnce advertsied; it will still throw out the 32bit PE.

This is if a collection has multiple advertisments it will churn out the latest image to be advertised.  To get around this I found a great article on "Network Steve" that I have included below:

I had the exact same problem;
I wanted to be able to boot x86 or x64 Unknown Computers and image them. I have figured a very simple and erffective work around to this problem of the last advertised task winning...
I edited the query in the Unknown Computers collection to add: and Name LIKE "%x86%"
here's the complete query for the "Unknown Computers" collection
select SMS_R_UNKNOWNSYSTEM.ResourceID,SMS_R_UNKNOWNSYSTEM.ResourceType,SMS_R_UNKNOWNSYSTEM.Name,SMS_R_UNKNOWNSYSTEM.Name,SMS_R_UNKNOWNSYSTEM.Name from SMS_R_UnknownSystem where Decommissioned = "0" and Name LIKE "%x86%"
Then I created a new collection called "Unknown Computers x64" and used the following query:
select SMS_R_UNKNOWNSYSTEM.ResourceID,SMS_R_UNKNOWNSYSTEM.ResourceType,SMS_R_UNKNOWNSYSTEM.Name,SMS_R_UNKNOWNSYSTEM.Name,SMS_R_UNKNOWNSYSTEM.Name from SMS_R_UnknownSystem where Decommissioned = "0" and Name LIKE "%x64%"
Next, Advertise your x86 Task Sequences to the Unknown Computers query and your x64 Task Sequences to the Unknown Computers x64 query.
Now, as long as the computer is not in the SCCM database, when you PXE boot it will get the correct image.
Good LuckDoug

http://www.networksteve.com/enterprise/topic.php/Boot_Image_pulling_wrong_Windows_PE_interface/?TopicId=25850&Posts=4